

How To Install Paste The Wall Wallpaper
How to Install Wallpaper
Updated: Aug. 12, 2022
x Tips to make hanging wallpaper a breeze.
Don't know how to hang wallpaper? Afraid if yous try you lot'll finish up more papered than the walls? Follow these x pro tips for how to install wallpaper, and your job will exist washed before you know it. And it'll expect great!
You might also like: TBD
Hanging wallpaper

Come across the expert
Bob Rowland has been hanging wallpaper for more than 44 years. He's covered hundreds of acres of commercial walls and has worked on everything from modest starter homes up to the governor'southward mansion in St. Paul, MN. He'southward i of our all-time resources for learning best practices for how to install wallpaper.
Anyone can hang wallpaper, but it takes a footling know-how to hang it directly and with tight, well-nigh invisible seams. We asked professional person paperhanger Bob Rowland to give us some insight into what it takes to become the job washed correct. He told the states that every quality job starts with careful planning and proper preparation.
How to install wallpaper: Map out the room
A. Use a curl to lay out the wall
Use a total roll of paper as a guide to lay out the room. Butt a roll into the corner where you lot plan to start, and brand a pencil mark on the wall at the border of the roll. Slide the whorl downward to that mark, and brand some other pencil mark at the other edge of the curlicue. Proceed doing this until you know where every seam is going to fall. You may take to cut downwardly the starting time panel to avoid hanging small strips (iii in. or less) nearly doors and corners.
B. Work away from the door you enter
Wallpaper seams on straight walls are butted, not overlapped, simply seams are less visible if yous place them at the bespeak farthest from where the first panel was installed. Minimize the visibility of seams past starting in the area opposite the virtually-used archway to the room.
C. Get-go with a plumb line
Don't assume the corner you're starting in is plumb. Apply a level and draw a straight plumb line about 1/iv in. past where you desire the get-go panel of paper to end. Accept into business relationship that inside corner seams demand to be overlapped at to the lowest degree ane/eight in. For more data, see "Seam Inside Corners" below.
D. Hibernate the last seam
If you're hanging paper that has a repeatable pattern, the design on the last seam is non going to line upwardly, and then try to hide it in a depression-visibility area. The corner just above the entry is usually the all-time spot.
Prep the walls
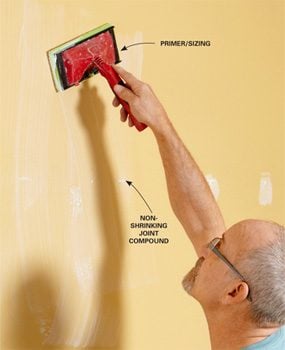
Use a "wall size" primer/sizing production
Using wall size will aid the paper adhere to the wall and reduce the risk that the paper will shrink. It besides makes information technology easier to remove the paper when the fourth dimension comes.
Start past removing plate covers, heat registers and low-cal fixtures. Fill up any holes with a nonshrinking joint compound and so you don't have to look until it dries and apply another layer. Scrape the walls with a drywall pocketknife or sand them with 50-grit sandpaper to remove smaller imperfections.
Finally, cover the whole wall with "wall size," a primer/sizing product. Bob is using Shieldz fabricated by Zinsser in the photograph. Don't skip this footstep! Using wall size volition help the paper adhere to the wall and reduce the take chances that the paper will shrink. Information technology likewise makes information technology easier to remove the newspaper when the time comes. One-gallon containers are available at domicile centers. And never, hang wallpaper over unfinished drywall—it won't ever come up off if you do. Make sure all the walls have at to the lowest degree one coat of primer.
Plus: Learn virtually another trend with interior walls: ombre wallpaper.
Lodge enough paper
When measuring a room, you need to take into account the pattern of the newspaper. Sometimes the pattern on i panel needs to line up horizontally with the pattern on the panel side by side to it. If you're measuring a room with 8-ft. walls and the paper you lot're hanging has a pink poodle that repeats every 54 in., but ii poodles will fit on each length of panel. If you cutting off the first panel and so the two poodles are centered on the wall, you'll take to cut well-nigh 1 ft. off the roll to make the poodle on the next panel line upwards with the first 1. This means y'all'll be using 9 ft. of paper for every 8 ft. of wall. Then in this example, you lot would multiply the linear feet of the room by nine ft. instead of viii ft.
Whorl on the paste—don't dunk!
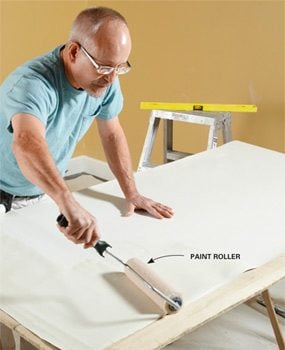
Utilize paste with a paint roller
Use a high-quality one/2-in.-nap paint roller cover to utilise paste—the inexpensive ones will leave fuzz assurance behind.
Use a loftier-quality ane/2-in.-nap pigment roller cover to apply paste—the cheap ones volition leave fuzz balls all over the paper. When working with prepasted products, Bob prefers to use a paint roller to roll the water on the newspaper. Submerging paper in a tray is messy and doesn't guarantee compatible coverage. He fifty-fifty adds a little paste to the water (2 cups per gallon) to encourage stronger adhesion.
Choose the right paste for your paper
At that place are three bones types of paste: clay, wheat and starch. Each grouping has several subcategories. Most wallpaper instructions will indicate which paste to use. Avoid the "universal" paste unless the paper you're hanging specifically calls for it.
Seam inside corners

Overlap to ensure the start run is plumb
When starting from an inside corner, allow at least 1/eight in. overlap on wallpaper from the side by side wall. This lets you hang the newspaper plumb, regardless of how plumb the corner is.
Corners are rarely perfectly straight. You'll need to create a seam at every inside corner to make the next panel plumb. The beginning panel installed in a corner should be overlapped onto the next wall at least 1/eight in. When working your way into a corner, measure over from the last panel to the corner at the top, eye and bottom. And then cut the corner panel 1/8 in. longer than the longest of the iii measurements. You lot tin can use the leftover piece to start the new wall, but yous may need to cut it at a slight angle to accommodate a kleptomaniacal corner. Some wallpaper won't stick to other wallpaper, and then run a small bead of seam adhesive in the corner earlier overlapping the 2d piece.
Utilise vinyl paper in high-traffic rooms
Wallpaper made from newspaper absorbs moisture and can be hard to clean. Vinyl products are better suited for bathrooms and kitchen and hallways, merely not all vinyl wallpapers are the same. Some are solid vinyl, others have a vinyl confront with a newspaper backing, and some are mostly paper with a thin vinyl coating. Solid vinyl wallpaper is the well-nigh resistant to moisture and the most washable. To avoid confusion, many manufacturers accept a "All-time Uses" characterization on each ringlet and exist sure to utilise vinyl wallpaper adhesive.
Book the paper before hanging
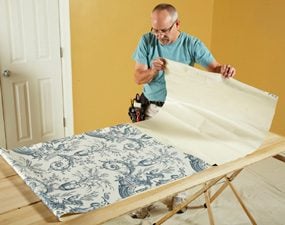
Fold the paper in thirds
Fold the paper and then that when you unfold information technology, you'll be working with two-thirds of the panel.
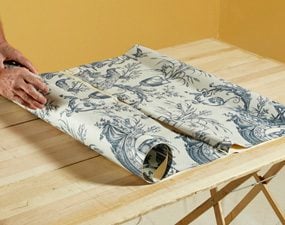
Roll the newspaper
After you've folded a length of paper, roll it. Set each roll in front of the wall where it's going to be hung.
Booking is the process of folding the newspaper in on itself. It allows fourth dimension for the paste to activate and the paper to soften. Fold the paper and so that when y'all unfold it, you lot'll be working with two-thirds of the console. The longer the newspaper, the easier it is to get directly. Cut a agglomeration of pieces of paper at once, and book several at the same time. Ready each roll in front end of the wall where it's going to exist hung. If y'all're a beginner, set them in a plastic bag to give you lot more time to work with them.
Gently smooth out the paper
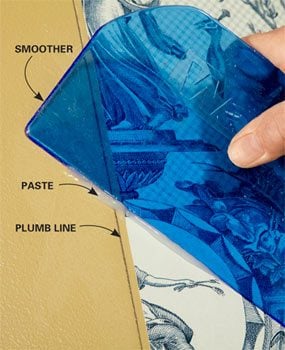
Employ a smoother
Run a smoother over every square inch of the paper. Don't push too hard and squeeze out the paste or stretch the paper.
One time the paper is on the wall, be sure to run your smoother over every square inch of the paper. But don't push button too hard on your smoother or you'll clasp out the paste and stretch the paper. This is particularly of import when you're working with prepasted newspaper. Stretched-out newspaper with too footling paste behind information technology is guaranteed to shrink when it dries. Shrinking causes gaps in the seams—gaps are bad.
Wipe down as you become
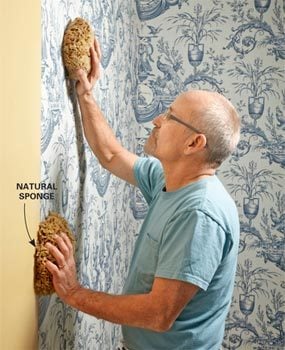
Keep it make clean
Utilise natural sponges to clean off paste residue after each canvass is hung. It's a lot easier to clean upwardly the paste while it's even so moist instead of waiting until it cures.
Information technology's a lot easier to clean upward the paste before information technology has fully cured, so Bob sponges off every panel with warm water equally he goes. He uses natural sponges, one in each paw. He swipes with the first and makes a final pass with the other. He uses a few drops of dish lather when he's working with especially mucilaginous paste. To avoid creating suds, Bob squeezes the sponges out while they're yet submerged in h2o, then he gives them another small squeeze to a higher place the water bucket.
Tools of the trade
Hanging wallpaper doesn't crave a huge investment. You probably already own many of the tools. Bob's well-nigh expensive tools are his beech wood cutting table and his magnesium straightedge. You tin can substitute an old door slab and a level.
Roll every seam
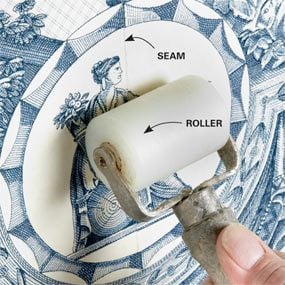
Set your edges with a roller
Don't printing too hard and squeeze out as well much adhesive.
To keep the edges from curling, you need to set them with a roller. Just the same rule that applies to the smoother applies to the roller: Don't press likewise difficult or you'll clasp out too much adhesive.
Overlap and cut both pieces at in one case
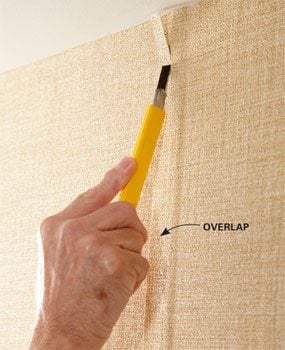
Cutting down the center of the overlap
Lap one panel over the other, and cut down the centre of the overlap. Angle the knife blade downwards low so more than than just the tip of the bract is doing the cut.
Sometimes, rather than butting one panel up to another, you'll demand to create your own seam. The all-time manner to do this is to lap one console over the other, and cutting downwardly the centre of the overlap. And then peel the ii pieces autonomously, and pull out the small strip that was cut off the underlying piece.
If you don't have a steady hand, you tin use a drywall knife as a cut guide. Try not to penetrate the drywall paper. Angle the knife blade downward low so more than merely the tip of the blade is doing the cut. Bob uses a pocketknife with blades that snap off. Blades are a lot cheaper than wallpaper, so he snaps off a department later on every cut.
Use a taping knife equally a cutting edge
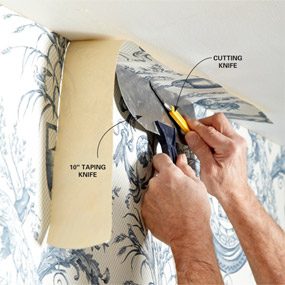
Use a drywall knife equally a straightedge
If you lot don't have a steady hand, you can use a drywall knife as a cutting guide.
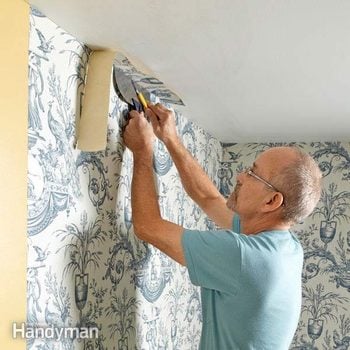
Get out an extra ii in. at the height and lesser, and use a drywall pocketknife equally a guide to trim it. Bob prefers a x-in. pocketknife so he doesn't have to move it as frequently as he would a smaller one. Hold the knife downwards close to the wall to avoid cutting into the ceiling.
Make relief cuts earlier trimming
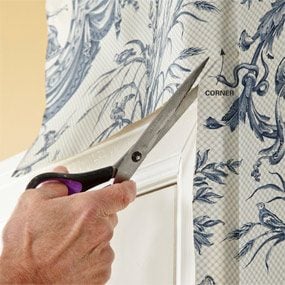
Utilise a scissors for relief cuts
Utilise a scissors instead of a knife to avert accidentally cut into wood trim and other obstacles.
When you're upwardly confronting trim or other obstacles, you'll need to make a relief cutting earlier trimming the paper. You could make the cutting with a knife, but scissors are meliorate to avert scratching the trim.
Required Tools for this how to install wallpaper Project
Accept the necessary tools for this DIY how to install wallpaper project lined up before you start—you'll save fourth dimension and frustration.
Pair of scissors
Sponge (natural)
Wallpaper roller
Wallpaper smoother
Required Materials for this Project
Avert last-minute shopping trips past having all your materials ready alee of time. Hither'south a listing.
Originally Published: June 24, 2022

Source: https://www.familyhandyman.com/project/how-to-wallpaper/
Posted by: pulsgointerstmen.blogspot.com
0 Response to "How To Install Paste The Wall Wallpaper"
Post a Comment