

How To Install Console Application In Visual Studio 2017
This browser is no longer supported.
Upgrade to Microsoft Edge to take reward of the latest features, security updates, and technical back up.
Tutorial: Create a .NET panel application using Visual Studio Code
This tutorial shows how to create and run a .NET console application past using Visual Studio Lawmaking and the .NET CLI. Project tasks, such equally creating, compiling, and running a projection are done by using the .NET CLI. You tin can follow this tutorial with a dissimilar code editor and run commands in a terminal if y'all prefer.
Prerequisites
- Visual Studio Code with the C# extension installed. For information about how to install extensions on Visual Studio Code, meet VS Code Extension Marketplace.
- The .Internet 6 SDK.
Create the app
Create a .Net console app projection named "HelloWorld".
-
Start Visual Studio Code.
-
Select File > Open Binder (File > Open... on macOS) from the primary carte.
-
In the Open up Folder dialog, create a HelloWorld folder and select information technology. And then click Select Binder (Open on macOS).
The folder proper name becomes the project proper noun and the namespace proper noun by default. You'll add code later on in the tutorial that assumes the project namespace is
HelloWorld. -
In the Do you trust the authors of the files in this binder? dialog, select Yes, I trust the authors.
-
Open the Terminal in Visual Studio Code past selecting View > Last from the chief card.
The Last opens with the command prompt in the HelloWorld folder.
-
In the Concluding, enter the following command:
dotnet new console --framework net6.0The project template creates a uncomplicated application that displays "Hi World" in the panel window by calling the Console.WriteLine(String) method in Program.cs.
Console.WriteLine("Hello, World!"); -
Replace the contents of Plan.cs with the following lawmaking:
namespace HelloWorld { course Program { static void Master(string[] args) { Console.WriteLine("Hello Earth!"); } } }The first time you edit a .cs file, Visual Studio Lawmaking prompts y'all to add the missing avails to build and debug your app. Select Yes, and Visual Studio Lawmaking creates a .vscode folder with launch.json and tasks.json files.
The code defines a class,
Programme, with a single method,Main, that takes a Cord array as an statement.Mainis the application entry point, the method that's called automatically by the runtime when it launches the application. Any command-line arguments supplied when the application is launched are available in the args assortment.In the latest version of C#, a new feature named top-level statements lets y'all omit the
Programgrade and theMainmethod. Most existing C# programs don't use top-level statements, so this tutorial doesn't use this new feature. But it's available in C# 10, and whether you use it in your programs is a matter of manner preference.
Run the app
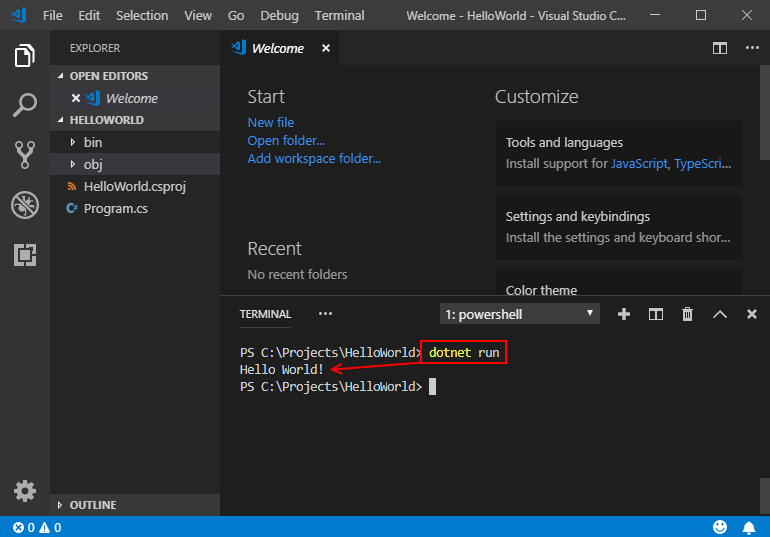
Run the post-obit command in the Terminal:
dotnet run The program displays "How-do-you-do World!" and ends.
Enhance the app
Enhance the awarding to prompt the user for their name and display it along with the date and time.
-
Open up Program.cs.
-
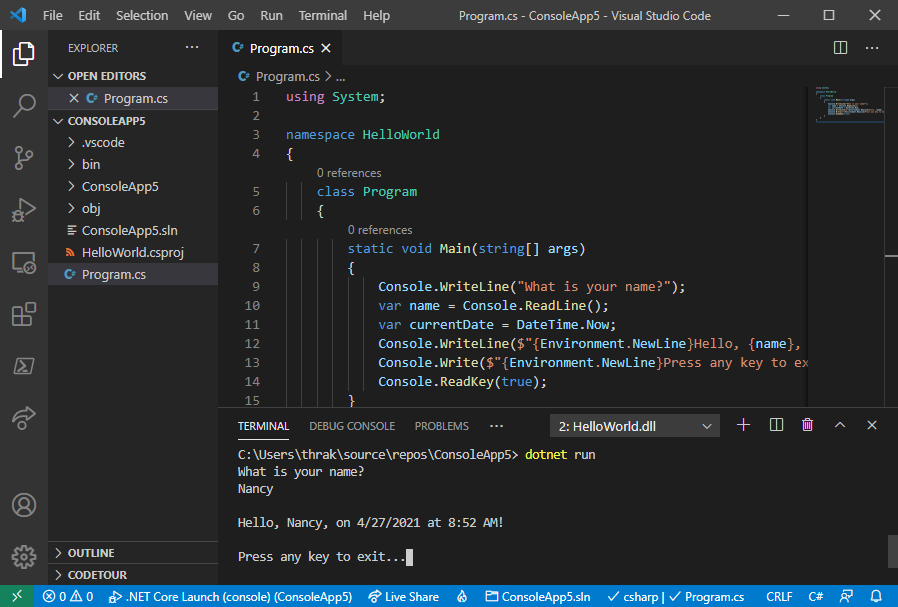
Supplant the contents of the
Principalmethod in Program.cs, which is the line that callsConsole.WriteLine, with the following code:Console.WriteLine("What is your proper noun?"); var proper noun = Console.ReadLine(); var currentDate = DateTime.Now; Console.WriteLine($"{Environs.NewLine}Hello, {name}, on {currentDate:d} at {currentDate:t}!"); Console.Write($"{Environment.NewLine}Press whatever key to exit..."); Panel.ReadKey(truthful);This lawmaking displays a prompt in the console window and waits until the user enters a string followed by the Enter key. It stores this string in a variable named
name. It also retrieves the value of the DateTime.Now property, which contains the current local time, and assigns information technology to a variable namedcurrentDate. And information technology displays these values in the panel window. Finally, it displays a prompt in the console window and calls the Panel.ReadKey(Boolean) method to wait for user input.NewLine is a platform-independent and language-independent fashion to stand for a line break. Alternatives are
\northwardin C# andvbCrLfin Visual Bones.The dollar sign (
$) in front of a string lets you lot put expressions such equally variable names in curly braces in the string. The expression value is inserted into the string in place of the expression. This syntax is referred to equally interpolated strings. -
Save your changes.
Of import
In Visual Studio Code, y'all have to explicitly save changes. Different Visual Studio, file changes are not automatically saved when you lot build and run an app.
-
Run the programme over again:
dotnet run -
Respond to the prompt by entering a name and pressing the Enter key.
-
Press any key to go out the program.
Additional resources
- Setting up Visual Studio Code
Next steps
In this tutorial, you created a .Net console application. In the next tutorial, you debug the app.
This tutorial shows how to create and run a .NET console application past using Visual Studio Code and the .Net CLI. Project tasks, such as creating, compiling, and running a project are done by using the .Net CLI. You can follow this tutorial with a unlike code editor and run commands in a concluding if you adopt.
Prerequisites
- Visual Studio Code with the C# extension installed. For data about how to install extensions on Visual Studio Code, come across VS Lawmaking Extension Marketplace.
- The .NET 5 SDK. If you install the .Internet 6 SDK, install the .NET 5 SDK as well, or some of the tutorial instructions won't piece of work. For more data, see New C# templates generate top-level statements.
Create the app
Create a .NET console app project named "HelloWorld".
-
Beginning Visual Studio Code.
-
Select File > Open Folder (File > Open... on macOS) from the main menu.
-
In the Open Folder dialog, create a HelloWorld binder and click Select Binder (Open on macOS).
The binder name becomes the project name and the namespace name past default. You'll add code later in the tutorial that assumes the projection namespace is
HelloWorld. -
Open the Concluding in Visual Studio Code by selecting View > Terminal from the main menu.
The Concluding opens with the command prompt in the HelloWorld folder.
-
In the Terminal, enter the post-obit command:
dotnet new console --framework net5.0
The template creates a simple "Hello Earth" application. It calls the Console.WriteLine(String) method to brandish "Hello World!" in the console window.
The template code defines a class, Program, with a single method, Main, that takes a String array equally an argument:
using System; namespace HelloWorld { class Plan { static void Main(string[] args) { Panel.WriteLine("Hello Globe!"); } } } Main is the awarding entry point, the method that's chosen automatically by the runtime when it launches the application. Whatsoever command-line arguments supplied when the application is launched are available in the args array.
Run the app
Run the following command in the Terminal:
dotnet run The program displays "Hello World!" and ends.
Raise the app
Enhance the awarding to prompt the user for their name and display information technology along with the date and time.
-
Open Programme.cs by clicking on it.
The first time you open a C# file in Visual Studio Lawmaking, OmniSharp loads in the editor.
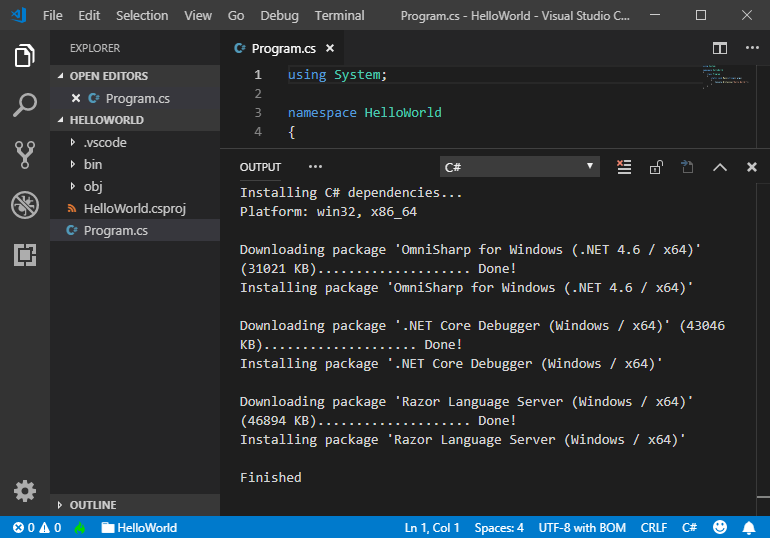
-
Select Yes when Visual Studio Code prompts you to add the missing avails to build and debug your app.

-
Supervene upon the contents of the
Principalmethod in Program.cs, which is the line that callsConsole.WriteLine, with the post-obit lawmaking:Panel.WriteLine("What is your name?"); var name = Panel.ReadLine(); var currentDate = DateTime.Now; Console.WriteLine($"{Environment.NewLine}Hello, {name}, on {currentDate:d} at {currentDate:t}!"); Console.Write($"{Environment.NewLine}Printing any central to exit..."); Console.ReadKey(true);This code displays a prompt in the console window and waits until the user enters a string followed by the Enter key. It stores this string in a variable named
proper name. Information technology also retrieves the value of the DateTime.At present belongings, which contains the current local time, and assigns information technology to a variable namedcurrentDate. And it displays these values in the panel window. Finally, it displays a prompt in the console window and calls the Panel.ReadKey(Boolean) method to wait for user input.NewLine is a platform-independent and language-independent way to represent a line pause. Alternatives are
\northwardin C# andvbCrLfin Visual Bones.The dollar sign (
$) in front of a cord lets you put expressions such as variable names in curly braces in the cord. The expression value is inserted into the string in place of the expression. This syntax is referred to every bit interpolated strings. -
Save your changes.
Important
In Visual Studio Code, you have to explicitly save changes. Unlike Visual Studio, file changes are non automatically saved when you build and run an app.
-
Run the program once again:
dotnet run -
Respond to the prompt by inbound a proper name and pressing the Enter primal.
-
Printing any central to exit the plan.
Additional resources
- Setting up Visual Studio Code
Adjacent steps
In this tutorial, you created a .Net console application. In the next tutorial, you debug the app.
This tutorial is only available for .Cyberspace 5 and .NET 6. Select one of those options at the top of the page.
Feedback
Submit and view feedback for

Source: https://docs.microsoft.com/en-us/dotnet/core/tutorials/with-visual-studio-code
Posted by: pulsgointerstmen.blogspot.com
0 Response to "How To Install Console Application In Visual Studio 2017"
Post a Comment